How To: DIY (Improved) Inexpensive Fog Screen
Last month we built an improved version of the DIY Fog Screen found here.
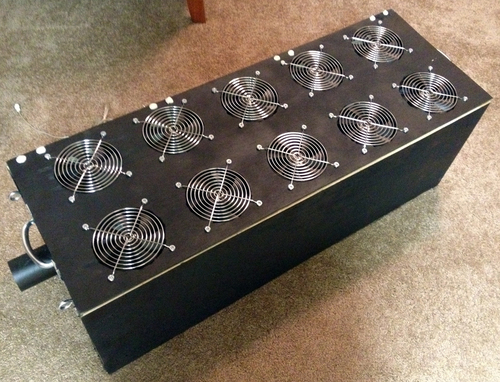

We call it “improved” since we managed to create a thinner sheet of fog, maintain the projection longer (a fog machine is bursty), and thicken the sheet. We use the same technique of creating a laminar flow. Instead of using a window fan we installed 10 120mm [17] computer fans with a variable speed controller [20] to optimize the flow, since we did not know the fog density.
Since the original article doesn’t explain the steps / tools / resources required to create a DIY Fog Screen, we’d like to take the opportunity and provide a “how to”. In a nut shell, the screen needs to distribute “fog machine”-fog from end-to-end, width-wise, and keep the fog flowing downward sandwiched between two flows of air.
Step 1: Build a box
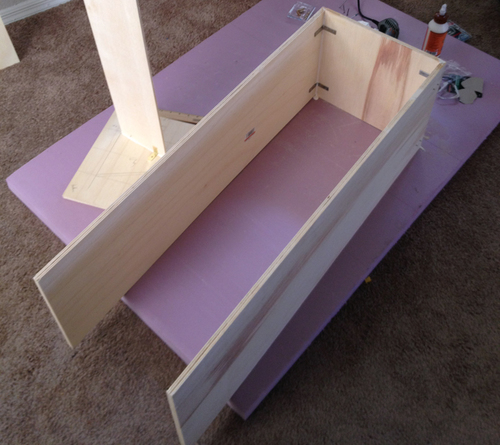
We choose to make a 3 foot-wide screen. We found a 12mm × 2’×4’ panel of plywood [11] for the sides, and a 5.2mm × 2’×4’ panel of plywood [10] for the internal fog compartment and top.
Cut 2 1’×1’ end-sides, and 2 3’×1’ length-sides.
For added durability we used 2 L-braces [2] at each corner, along with wood glue [7] to seal the edges. You shouldn’t need the braces, but we planned on shipping the screen, and wanted to be safe. Also, be sure to note the configuration of end-sides. If you glue them to the inside of the length-end the effective width of the screen will shrink by 1’’.
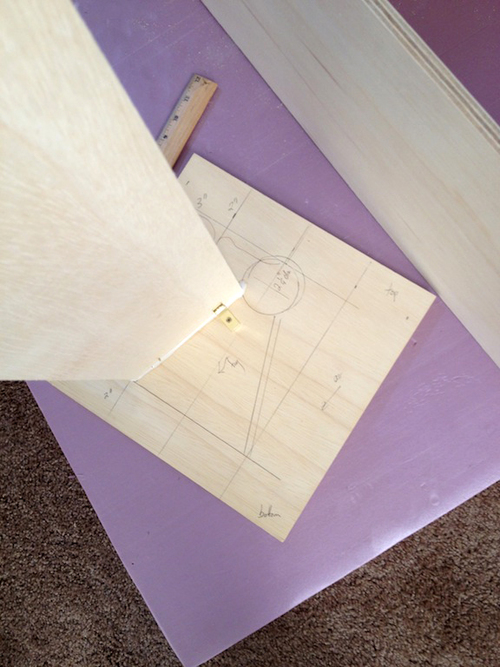
Draw a 2’’ circle on either end-side 2’’ from the top, centered.
Use a hole-saw or Dremel to cut out one hole. This will serve as the input for a PVC pipe [3] (“fog pipe”) which will shuttle the fog from the fog machine into the screen box.
Cut 2 3’×1/2’ sides from the smaller ply to create the internal fog compartment (inner sides). Use wood glue (and L-braces [1] if you’d like) to secure them against the end-sides. We choose to follow the original design and angle-out this compartment to catch eddying fog caused by the out-flow from our “fog-pipe”. To mimic this effect, mark 3’’ lines from the left and right sides of the end-sides. Like the top, mark a line 2’’ from the bottom. Now align the inner sides from the intersection of the 3’’ and 2’’ lines on the bottom-left and bottom-right to touch an edge of the centered circle 2’’ from the top.
Step 2: Assemble a “fog pipe”.
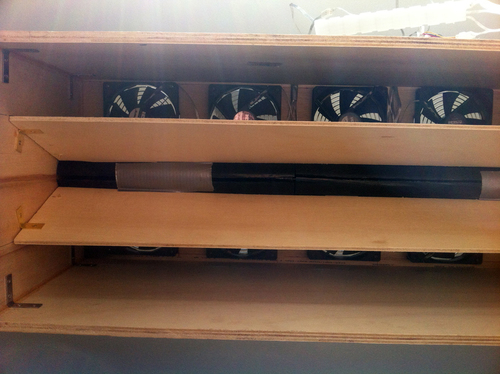
We choose two, 2’’ diameter, 2’ long PVC pipes [3] to rest along the inner top of the fog compartment ply. We cut one pipe to reduce the length to 1-1/2’ to span the 3’ width of the box; with and additional 1/2’’ for the end-side width (x2), and 2’’ to attach a hose [9] on the outside of the box.
The second most tedious part of the assembly is cutting a 1/4’’ opening length-wise down the two pieces of PVC. This opening will face downward into the box-screen and allow fog to escape and fall into the laminar flow. This plastic will compress, so cut at least 1/2’’ out length-wise. We used a plastic-cutting bit for our Dremel and a box cutter to clear any molten plastic.
We then used a 3’’ diameter dryer duct [9] to connect the protruding 2’’ PVC pipe to the output of the fog machine. To direct airflow we installed a 60mm fan [18] to the end of the PVC pipe using a rubber PVC connector [5] by cutting holes for the four corners of the fan. Feel free to add some creativity here, but you’ll want something to pull the fog into the pipe, else it will idle longer in the duct, or escape back into the fog machine.
Step 3: Create an airflow
Other than the finished screen, creating an air flow should be the most exciting part of the project. In the original DIY design, the creator used a window-fan. We wanted something more subtle, and controllable, so we decided on 120mm computer fans [17]. Plus, loud and fast fans are inexpensive. We tried to maximize cost to CFM (cubix feet per minute), and purchased 10 BGears b-Blasters, rated at 103CFM.
We also purchased an external fan controller [20] to power and vary the speed, which would allow us to decrease the CFM at run-time. We used this to optimize the air flow to best contain the fog screen.
We used a Dremel, with a wood-cutting bit, to cut the 10 holes in the lid of the screen box. Then used 10 fan grills [19] to protect and secure the fans to the lid. Unfortunately the screws provided with the fans will not support this, you’ll need screws [13] long enough to secure the grill to the lid, and the lid to the fan.
And for easy transportation we used hinges [4] to secure the lid-o-fans to the screen box.
Step 4: Direct the airflow.
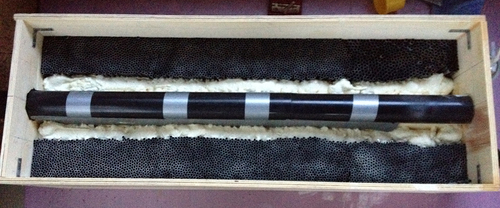
The laminar flow depends on two parallel directional airflows, it is a function of speed, density, and diameter. The bazillion straws may look funny, but they’re every bit necessary. During our debugging phase we tested the screen without a directional flow (no straws) and the outcome was less than satisfying.
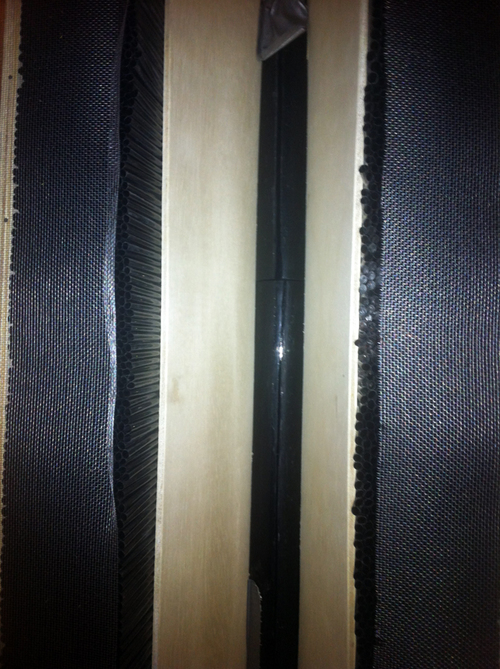
For the straws, we ordered 8 boxes of 500 fat black straws [16]. Since we control the speed variable, we can set the diameter and thickness arbitrarily. Now how do you get 4000 straws to align and remain during projections? Glue? We used a combination of glue [15] and a thin wire-screen [12] on the top and bottom of the straws. While the box sat on ground, face up, we packed in the straws (2000 per-side). Using the pressure of surrounding straws, ground, and the sides of the box, the straws should stay (until you lift the box of course). Using spray-adhesive, create a thin film of glue across the top of both sets of straws. This will cause the tips of straws to bond. The straws will also bond to the sides of the box, making them semi-resistant to gravity.
To complete the straw-structure, we placed a wire-screen on top and bottom.
Step 5: Create some fog, and project
To finish it up, you’ll need a simple fog machine and a projector.
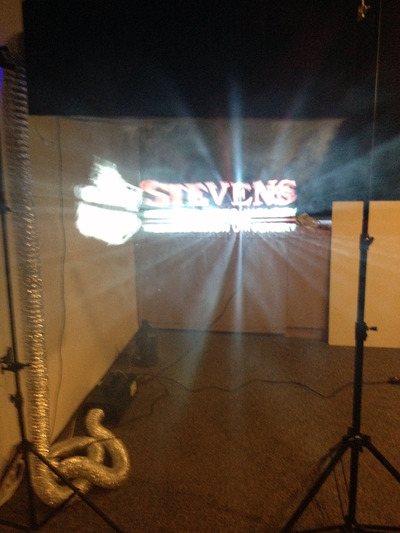
Note: in our original design, like the original DIY project, we cooled the fog before it entered the box-screen. We found that the cooling had no effect on the fog flow.
Materials
- 2x Solid Brass Bracket 1/2×1/8 (5.54)
- 2× 1.5’’ CORNER Brace Stainless Stl 4pk (9.14)
- 2× 2in x 2ft ABS Pipe (7.70)
- 2x Solid Br.Broad Butt Hng 2×1-3/8 (5.94) [optional]
- 2’’ CI/PLS/CU Flex Coupling (4.33)
- 394 GP 9 MIL Duct Tape-1.89INx55YDS (3.78) [optional]
- Gorilla Wood Glue (3.83)
- E/O 16oz Big Gap Filler Great Stuff (4.96)
- 3’‘x25’ Flexible Aluminum Duct (13.77)
- 5.2mm Sande Ply 23.75INx47.75IN (8.89)
- 12mm 2’×4’ Sanded Handypanel (14.92)
- 36×84’’ Brite Aluminum (7.48)
- Wood Screw Fh-Ph 10×1-1/2 (5.58)
- Scotch Blue 2’’ Painter’s Tape (6.37) [optional]
- 3M 45 General Purp Spray Adhesive (5.77)
- 8x Black Fat Straws - 8IN (39.60)
- 10x Bgears b-Blaster 120 2 B Hi-Speed Bearing Fan - 120mm, 103CFM, 2000RPM (69.90)
- Silenx IXP3416 iXtrema Pro Fan - 60mm x 25mm, 16dBA, 18CFM (9.99)
- 10x FILTER MASSCOOL | FG-2P-120MM RT (24.95)
- SILENX FAN CONTROLLER | IXA-FCEX R (34.99)
Materials 1-15 are from Home Depot, 16 is from BarProducts.com, 17,18 are from TigerDirect, and 19,20 are from NewEgg.