Minnowboard Max: Quickstart UEFI Secure Boot
This is the first post of a new collection related to Intel’s Minnowboard MAX development board. It begins with a barebones quick start leading to the simplest UEFI-based Secure Boot and paves the way towards a Secure Root of Trust Measurement (SRTM), where the “root” is the UEFI platform code.
By the end of the article the Minnowboard MAX will boot a Ubuntu 14.04 operating system using a signed shim bootloader, a signed GRUB stage 2 bootloader, and a signed Linux 3.xx kernel. The UEFI platform code will not be changed, meaning the out-of-the-box firmware will remain (no flashing), and any kernel modules or Linux executables will remain unsigned and unmeasured.
Here is a good layout of the Minnowboard MAX (image below). The board is slightly unique in that it provides an expansion set of headers for the SPI flash controller (which contains the small flash card housing UEFI or other firmware platform code), some state of the art peripherals, and well documented UEFI/Tianocore support code though some of it is only available in binary form. The MAX also supports non-UEFI booting though other common embedded development board firmware.
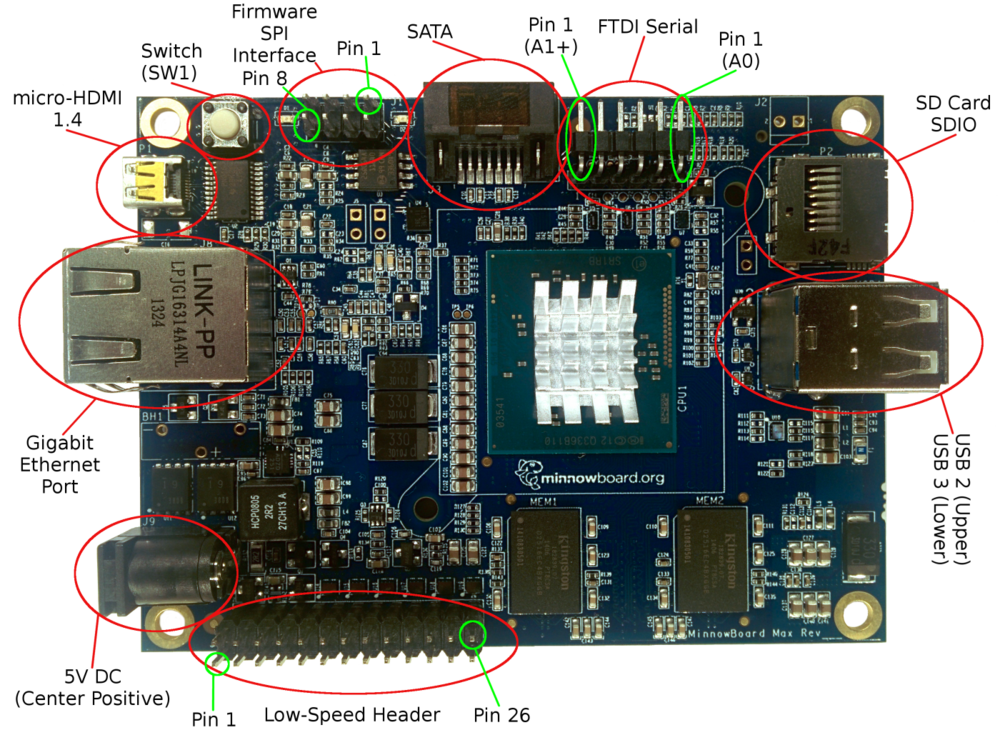
eLinux’s Minnowboard Max with component highlights.
I purchased the board to refresh my knowledge of UEFI development and get hands on experience breaking security and safety features though tailored mis-management, induced catastrophic error cases, and if time permits– a healthy amount of vulnerability research and fuzzing.
Helpful Minnow-related links:
- eLinux’s wiki on the MinnowBoard: http://wiki.minnowboard.org/…/MinnowBoard_Max_RevA2_sch.pdf
- The FAQ and Wiki on the main Minnowboard site are very helpful too!
I highly recommend purchasing:
- The latest MAX, I use an A2.
- Micro HDMI, the rarest of HDMI cables
- 64GB+ SDXC SD card for the operating system install
- Super awesome blue ionized case to keep the MAX safe
- (Not used yet) FIDI Serial USB adapter for debugging
- (Not used yet) SPI Flash programmer
Part 1: “Unboxing” or Installing Ubuntu 14.04
I love Ubuntu! It’s really easy to install on the MAX too! Create an “install USB” with unetbootin, attach the USB to the MAX along with a mouse, keyboard, and micro HDMI cable plus monitor. I had to manually select the UEFI USB boot option as the default boot order is the UEFI shell. Exiting the UEFI shell brings you to the UEFI Setup (this looks like a familiar blue BIOS setup screen).
After installing Ubuntu to a 64GB SDXC SD card, and again changing the boot order to now include the SD card’s new EFI FAT formatted first partition, I took inventory of the Minnowboard A2:
$ uname -a
Linux minnowator 3.19.0-26-generic #28~14.04.1-Ubuntu SMP Wed Aug 12 14:09:17 UTC 2015 x86_64 x86_64 x86_64 GNU/Linux

$ cat /proc/cpuinfo | grep model_name
model name	: Intel(R) Atom(TM) CPU  E3825  @ 1.33GHz
model name	: Intel(R) Atom(TM) CPU  E3825  @ 1.33GHz

$ lspci
00:00.0 Host bridge: Intel Corporation ValleyView SSA-CUnit (rev 11)
00:02.0 VGA compatible controller: Intel Corporation ValleyView Gen7 (rev 11)
00:14.0 USB controller: Intel Corporation ValleyView USB xHCI Host Controller (rev 11)
00:1a.0 Encryption controller: Intel Corporation ValleyView SEC (rev 11)
00:1b.0 Audio device: Intel Corporation ValleyView High Definition Audio Controller (rev 11)
00:1c.0 PCI bridge: Intel Corporation ValleyView PCI Express Root Port (rev 11)
00:1c.2 PCI bridge: Intel Corporation ValleyView PCI Express Root Port (rev 11)
00:1c.3 PCI bridge: Intel Corporation ValleyView PCI Express Root Port (rev 11)
00:1f.0 ISA bridge: Intel Corporation ValleyView Power Control Unit (rev 11)
00:1f.3 SMBus: Intel Corporation ValleyView SMBus Controller (rev 11)
02:00.0 Ethernet controller: Realtek Semiconductor Co., Ltd. RTL8111/8168/8411 PCI Express Gigabit Ethernet Controller (rev 0c)
The Atom E3825’s ARK page has some unfortunate news, it does not explicitly support newer Intel hardware security technologies like IOMMU/VT-d, TXT, vPro (AMT) or Boot Guard, BIOS Guard (PFAT), and definitely not SGX. But, as we research a bit more there might some hope! Let’s keep note of ValleyView (BayTrail), SSA-CUnit, ValleyView Gen7, and explore a bit more.
$ sudo dmidecode | head -n 46
# dmidecode 2.12
# SMBIOS entry point at 0x759e5000
SMBIOS 2.8 present.
27 structures occupying 1145 bytes.
Table at 0x759E4000.

Handle 0x0000, DMI type 0, 24 bytes
BIOS Information
	Vendor: Intel Corp.
	Version: MNW2MAX1.X64.0080.R01.1505111746
	Release Date: 05/11/2015
	Address: 0xF0000
	Runtime Size: 64 kB
	ROM Size: 64 kB
	Characteristics:
		PCI is supported
		BIOS is upgradeable
		BIOS shadowing is allowed
		Boot from CD is supported
		Selectable boot is supported
		EDD is supported
		8042 keyboard services are supported (int 9h)
		Serial services are supported (int 14h)
		Printer services are supported (int 17h)
		CGA/mono video services are supported (int 10h)
		ACPI is supported
		USB legacy is supported
		ATAPI Zip drive boot is supported
		BIOS boot specification is supported
		Function key-initiated network boot is supported
		Targeted content distribution is supported

Handle 0x0001, DMI type 2, 17 bytes
Base Board Information
	Manufacturer: Circuitco
	Product Name: MinnowBoard MAX
	Version: REV A
	Serial Number: 001320FE____
	Asset Tag: To be filled by O.E.M
	Features:
		Board is a hosting board
		Board is replaceable
	Location In Chassis: To be filled by O.E.MEnglish
	Chassis Handle: 0x0000
	Type: Unknown
	Contained Object Handles: 0
The canonicalized Firmware version is MNW2MAX1.X64.0080.R01.1505111746 and reports a build date of 05/11/2015. Here are the v0.82-r01 release notes, and the binary-distributable Release version (a zip). Looking at the reported firmware version from the SMBIOS table, let’s assume the release was cut at 15 = 2015, 05 = May, 11 = the 11th, 17 = 5PM, 46 = well… almost 6PM. When I purchased the board the latest UEFI firmware version available for the MAX on Intel’s download page was v0.81, released July 1st, there’s now a v0.82, so I’ll definitely be upgrading in the near future.
For now, we are only interested in executing a signed bootloader and signed kernel by enforcing valid signatures from with UEFI. Let’s explore more of the vanilla Ubuntu 14.04 install with a focus on preparing this signature checking. Ubuntu is awesome and supplies the signed components in binary form.
$ aptitude search signed | wc -l
74
$ aptitude search signed | grep -E "^i"
i   grub-efi-amd64-signed           - GRand Unified Bootloader, version 2 (EFI-A
i   linux-signed-generic-lts-vivid  - Complete Signed Generic Linux kernel and h
i A linux-signed-image-3.19.0-26-ge - Signed kernel image generic
i A linux-signed-image-generic-lts- - Signed Generic Linux kernel image
i   shim-signed                     - Secure Boot chain-loading bootloader (Micr
What does this mean? In most desktop and laptop UEFI Secure Boot capable off-the-shelf consumer and enterprise machines, UEFI Secure Boot is enabled. A default OEM-provided install of Windows comes default on these machines. That install has already created a GUID-based partition table, a FAT-formatted small “EFI” partition, and installed an EFI application (bootloader) into a default path within that filesystem. A DVD/USB install of Windows 8.1+ will do the same thing. That EFI bootloader is an extensible part of UEFI and provides the logic to retrieve, load, and begin executing an operating system (kernel).
If an attacker can run-time mount the small EFI partition and modify the bootloader, that attacker can execute code before the operating system kernel. In the most basic case this involves booting a separate kernel that lacks certain run-time security features. This level of access already means game over for your system’s security, but allows attacks to continue to avoid detection or persist in more survivable ways. If you are interested in the specifics of the attack model and examples please read some of the firmware security “offensive” focused research.
To prevent this simple mount + replace bootloader attack UEFI may enforce signature checking of the bootloader. This is the first component and goal of UEFI Secure Boot. The systems mentioned before, and the Minnow, include a protected flash chip usually via an SPI bus and commonly called: SPI flash. These contain a set of flash regions and a firmware descriptor header. We will focus more on this flash chip later. For now, know that one region contains the UEFI platform code, which is one of the first things executed by the CPU on reset (power on). The SPI controller, in tandem with the UEFI platform code, and other protected run-time modes make sections of this region available as NVRAM. This means during UEFI platform execution and during operating system execution, these UEFI variables can be read and written.
There are two related Linux modules for reading and writing UEFI variables called: efi vars and efivars fs. The newer “efivars fs” is easier to write library integrations for– and supports the latest UEFI-spec for NVRAM features. The out-of-the-box Ubuntu kernel, 3.19.0-26 supports the later, so much rejoicing was had! It actually supported both, so you’re free to play around in the default-mounted sysfs structures to compare. There’s one more important caveat for now: some of the most important UEFI variables are set within UEFI platform execution and are NOT backed by NVRAM storage. These are almost always read-only and provide important decision points for UEFI driver execution and the OS. To determine if a variable is backed by NVRAM storage check for the NV (EFI_VARIABLE_NON_VOLATILE) attribute.
$ cd /sys/firmware/efi; find ./efivars
./efivars/MTC-eb704011-1402-11d3-8e77-00a0c969723b
./efivars/BootOrder-8be4df61-93ca-11d2-aa0d-00e098032b8c
./efivars/Boot0005-8be4df61-93ca-11d2-aa0d-00e098032b8c
./efivars/Setup-ec87d643-eba4-4bb5-a1e5-3f3e36b20da9
./efivars/Boot0004-8be4df61-93ca-11d2-aa0d-00e098032b8c
./efivars/Boot0003-8be4df61-93ca-11d2-aa0d-00e098032b8c
./efivars/RTC-378d7b65-8da9-4773-b6e4-a47826a833e1
./efivars/Boot0002-8be4df61-93ca-11d2-aa0d-00e098032b8c
./efivars/Boot0001-8be4df61-93ca-11d2-aa0d-00e098032b8c
./efivars/PciLanInfo-0d9a1427-e02a-437d-926b-aa521fd722ba
./efivars/Boot0000-8be4df61-93ca-11d2-aa0d-00e098032b8c
./efivars/BootState-60b5e939-0fcf-4227-ba83-6bbed45bc0e3
./efivars/ConIn-8be4df61-93ca-11d2-aa0d-00e098032b8c
./efivars/ConOut-8be4df61-93ca-11d2-aa0d-00e098032b8c
./efivars/ErrOut-8be4df61-93ca-11d2-aa0d-00e098032b8c
./efivars/Lang-8be4df61-93ca-11d2-aa0d-00e098032b8c
./efivars/PlatformLang-8be4df61-93ca-11d2-aa0d-00e098032b8c
./efivars/Timeout-8be4df61-93ca-11d2-aa0d-00e098032b8c
./efivars/HwErrRecSupport-8be4df61-93ca-11d2-aa0d-00e098032b8c
./efivars/ItkBiosModVar-3812723d-7e48-4e29-bc27-f5a39ac94ef1
./efivars/PlatformInfo-10ba6bbe-a97e-41c3-9a07-607ad9bd60e5
./efivars/OsSelection-86843f56-675d-40a5-9530-bc858372f103
./efivars/certdb-d9bee56e-75dc-49d9-b4d7-b534210f637a
./efivars/AuthVarKeyDatabase-aaf32c78-947b-439a-a180-2e144ec37792
./efivars/SetupDefault-ec87d643-eba4-4bb5-a1e5-3f3e36b20da9
./efivars/SECUREBOOT_CONFIGURATION-5daf50a5-ea81-4de2-8f9b-cabda9cf5c14
./efivars/BmmData-642237c7-35d4-472d-8365-12e0ccf27a22
./efivars/FeData-1f2d63e1-febd-4dc7-9cc5-ba2b1cef9c5b
./efivars/IP6_CONFIG_IFR_NVDATA-02eea107-98db-400e-9830-460a1542d799
./efivars/EfiNicIp4ConfigVariable-09d5b53f-f4b0-4f59-a0b1-7b57d35c0e05
./efivars/BootCurrent-8be4df61-93ca-11d2-aa0d-00e098032b8c
./efivars/ErrOutDev-8be4df61-93ca-11d2-aa0d-00e098032b8c
./efivars/ConOutDev-8be4df61-93ca-11d2-aa0d-00e098032b8c
./efivars/ConInDev-8be4df61-93ca-11d2-aa0d-00e098032b8c
./efivars/PlatformLangCodes-8be4df61-93ca-11d2-aa0d-00e098032b8c
./efivars/LangCodes-8be4df61-93ca-11d2-aa0d-00e098032b8c
./efivars/OsIndicationsSupported-8be4df61-93ca-11d2-aa0d-00e098032b8c
./efivars/BootOptionSupport-8be4df61-93ca-11d2-aa0d-00e098032b8c
./efivars/PlatformCpuInfo-10ba6bbe-a97e-41c3-9a07-607ad9bd60e5
./efivars/VendorKeys-8be4df61-93ca-11d2-aa0d-00e098032b8c
./efivars/SecureBoot-8be4df61-93ca-11d2-aa0d-00e098032b8c
./efivars/SignatureSupport-8be4df61-93ca-11d2-aa0d-00e098032b8c
./efivars/SetupMode-8be4df61-93ca-11d2-aa0d-00e098032b8c
This is not an exhaustive set of variables. There are several levels of abstraction: UEFI region layout, SPI controller, SMM, Linux kernel, efivars sysfs driver that allow a filesystem-based read and write of these variables. Let’s take a look at the SecureBoot variable:
$ od -An -t u1 ./SecureBoot-8be4df61-93ca-11d2-aa0d-00e098032b8c
   6   0   0   0   0
| This UEFI variable was given the canonicalized name “SecureBoot”, uses the GUID “8be4df61-93ca-11d2-aa0d-00e098032b8c”, has an attributes bitmask of 2 | 4, and contains a 4-byte unsigned boolean integer = 0. |
I’m still looking for an exhaustive set of UEFI variable names and their GUIDs, a handful on each OEM and board series are proprietary and undocumented. The most basic set of variables is in the GlobalVariable.h header within Tianocore’s EDK. A very loose description of SecureBoot says 0 = not enabled, 1 = enabled.
By default, the Minnowboard MAX does NOT have secure boot enabled, since dependent variables do not exist, and the efivars sysfs corroborates this setting. This post will conclude with us flipping that bit and using one more source of truth. But first we must write dependent variables, which are not reported in this list; they are the sets of certificates capable of (1) updating the downstream certificate stores, (2) set of certificates allowed to sign firmware updates, (3) set of certificates allowed to sign UEFI DXE drivers, Option ROMs, and bootloaders, and (4) a blacklisted certificate set.
Part 2: Creating a Certificate Authority for managing firmware updates
In the first part we learned a bit about the hardware and UEFI secure boot setup. And at the end I mentioned a few important variables were missing from the efivars list. Let’s investigate our setup a bit more and take care of those variables. For this we’ll use Intel’s chipsec, a platform security research tool NOT recommended for production use. This pretty awesome assessment tool will install a research-grade (read: pretty dangerous) kernel module. We are in learning mode so it is fine for our needs.
$ sudo apt-get install nasm
$ git clone https://github.com/chipsec/chipsec
$ cd ./chipsec/source/drivers/linux/
$ make
$ sudo bash ./run.sh
$ cd ../../tool
$ sudo python ./chipsec_main.py
Let’s then focus on some important bit of the tool’s verbose output:
[*] Variable SecureBoot (BS+RT) [*] Variable SetupMode (BS+RT) [!] Secure Boot variable PK is not found [!] Secure Boot variable KEK is not found [!] Secure Boot variable db is not found [!] Secure Boot variable dbx is not found [-] Some required Secure Boot variables are missing [-] FAILED: Not all Secure Boot UEFI variables are protected … [CHIPSEC] Modules failed 4: [-] FAILED: chipsec.modules.common.spi_desc [-] FAILED: chipsec.modules.common.spi_lock [-] FAILED: chipsec.modules.common.bios_wp [-] FAILED: chipsec.modules.common.secureboot.variables
The secureboot.variables failed module is our focus meaning we need to set PK, KEK, db, and dbx, the exact set of missing variables mentioned before. This selected output also reports the attributes for SecureBoot, BS meaning the variable can be read during UEFI boot serivces, and RT meaning run-time.
From https://wiki.ubuntu.com/SecurityTeam/SecureBoot:
- DB (aka, ‘signature database’): contains the trusted keys used for authenticating any applications or drivers executed in the UEFI environment
- DBX (aka, ‘forbidden signature database’ or ‘signature database blacklist’): contains a set of explicitly untrusted keys and binary hashes. Any application or driver signed by these keys or matching these hashes will be blocked from execution.
- KEK (key exchange keys database): contains the set of keys trusted for updating DB and DBX
- PK (platform key - while PK is often referred to simply as a single public key, it could be implemented as a database). Only updates signed with PK can update the KEK database.
The suggested implementation by UEFI:
- OEM key in PK
- OS vendor keys in KEK and DB. OEM may also have a key in KEK and DB
Systems shipping with Windows 8 will typically use the following:
- OEM key in PK
- ‘Microsoft Corporation KEK CA’ key in KEK
- ‘Microsoft Windows Production PCA’ and ‘Microsoft Corporation UEFI CA’ keys in DB (note, the ‘Microsoft Corporation UEFI CA’ is not guaranteed to be present in DB– while recommended, this is EFI firmware vendor/OEM dependent)
In order to boot on the widest range of systems, Ubuntu uses the following chain of trust:
- Microsoft signs Canonical’s ‘shim’ 1st stage bootloader with their ‘Microsoft Corporation UEFI CA’. When the system boots and Secure Boot is enabled, firmware verifies that this 1st stage bootloader (from the ‘shim-signed’ package) is signed with a key in DB (in this case ‘Microsoft Corporation UEFI CA’)
- The second stage bootloader (grub-efi-amd64-signed) is signed with Canonical’s ‘Canonical Ltd. Secure Boot Signing’ key. The shim 1st stage bootloader verifies that the 2nd stage grub2 bootloader is properly signed.
- The 2nd stage grub2 bootloader boots an Ubuntu kernel (as of 2012/11, if the kernel (linux-signed) is signed with the ‘Canonical Ltd. Secure Boot Signing’ key, then grub2 will boot the kernel which will in turn apply quirks and call ExitBootServices. If the kernel is unsigned, grub2 will call ExitBootServices before booting the unsigned kernel)
- If signed kernel modules are supported, the signed kernel will verify them during kernel boot
Since the above gives the ability to control boot to the OEM and Microsoft, users may want to:
- A. install their own key in PK, KEK and DB, then re-sign grub2 and use it without shim (and optionally sign the kernel with their own key)
- B. install their own key in PK and KEK, Canonical’s ‘Canonical Ltd. Master Certificate Authority’ key in KEK and DB and Microsoft’s keys in KEK (for updates to DBX). This gives some control of boot to Canonical, but allows for the grub-efi-amd64-signed and linux-signed packages and any DB/DBX updates from Microsoft and Canonical to work without re-signing.
The option (B) is pretty excellent. We place trust in our self or IT department, which we should already be trusting, as well as Microsoft and Canonical. The latter is acceptable for now and essentially allows an apt-get update to preform flawlessly. This requirement will be removed when we’re building and using our own kernel for some added features and fun.
We have an empty PK, KEK, and DB/DBx, normally our OEM’s key would be in PK. Firmware updates signed with PK are allowed to update KEK, and only updates signed with KEK are allowed to update DB, DBx. To get shim working, and verify the signature of our stage2 GRUB and kernel we’ll unconventionally stick “Microsoft Corporation UEFI CA” into our DB.
The Microsoft certificates are detailed in DN747883 and can be downloaded from: http://go.microsoft.com/fwlink/?LinkID=321194. We’ll then follow a simple guide to create a personal certificate authority and generate keys and certificates.
$ openssl req -new -x509 -extensions v3_ca -keyout cakey.pem -out $ cacert.pem -days 3650
$ openssl genrsa -des3 -out pk.key 2048
$ openssl req -new -key pk.key -out pk.csr
$ openssl ca -in pk.csr -config /etc/ssl/openssl.cnf
$ openssl genrsa -des3 -out kek.key 2048
$ openssl req -new -key kek.key -out kek.csr
$ openssl ca -in kek.csr -config /etc/ssl/openssl.cnf
Now we have a CA, a certificate to use as our PK, and a certificate for our KEK. Our DB will contain Microsoft’s UEFI CA and our DBx will be empty. Let’s talk about how we turn these into UEFI-formatted updates and write them to NVRAM in the next section.
Part 3: Installing firmware and bootloader signing public keys
Ready for another UEFI and Secure boot intricacy!? Absolutely! In the chipsec output there was another selected “meta” UEFI variable not backed by NVRAM: SetupMode. Also note, in some UEFI platform implementation these variables could be backed by NVRAM and changing them (and the security they control) could be as easy as a OS/run-time write. In future articles we should discuss how run-time protections of variables can be enforced (and attacked).
So SetupMode! This variable is a hint that no PK exists in NVRAM, thus the platform is expecting the owner to set up configurations. When SetupMode is “enabled” the PK, KEK, DB/DBx variables can be modified without authentication checks. This makes sense as no platform key exists to enforce signature checking of updates. However, it is expected that writes are still limited to the platform owner. This isn’t 100% the case, attacks and creative workflows exist that allow a software-controlled update in SetupMode. What it does mean is updates are restricted to boot services, which we’ll cover in a moment.
The certificates in PEM and DER form are unacceptable, they must be added to UEFI signature lists and properly signed. Let’s install the needed tools and perform the conversions:
$ sudo apt-get install efitools
Convert the PK certificate into a signature list then generate a UEFI update self-signed with the PK.
$ sudo cert-to-efi-sig-list pk.crt pk.esl
$ sudo sign-efi-sig-list -k pk.key -c pk.crt PK pk.esl pk.auth
Authentication Payload size 1000
Enter PEM pass phrase: ******************
Signature of size 1593
The KEK will be ever so slightly different, in that it will be signed by the PK (not itself).
$ sudo cert-to-efi-sig-list kek.crt kek.esl
$ sudo sign-efi-sig-list -k pk.key -c pk.crt KEK kek.esl kek.auth
Authentication Payload size 1005
Enter PEM pass phrase: ******************
Signature of size 1593
The DB will contain a single certificate for now. Since this demonstration is using the Ubuntu-provided signed shim, stage2 GRUB bootloader, and kernel– only the Microsoft UEFI CA will be included. Later, we will update the DB by creating another authenticated update signed by our KEK.
$ openssl x509 -inform der -in ms-uefi-db.crt -out db.crt
$ sudo cert-to-efi-sig-list db.crt db.esl
$ sudo sign-efi-sig-list -k kek.key -c kek.crt DB db.esl db.auth
Authentication Payload size 1640
Enter PEM pass phrase: ******************
Signature of size 1596
Now copy these *.auth updates to a FAT-formated USB stick.
The efitools package staged some EFI applications in /usr/share/efitools/efi/*.efi, also copy these to your USB stick. Now reboot the Minnow while it is still connected to a HDMI cable and allow it to boot into the UEFI shell. If you changed the boot manager’s boot order you will have to interrupt boot and manually select the UEFI shell.
The USB drive should be detected as a filesystem and listed when you first see a shell prompt. On my Minnow this was FS1. This is the boot services mode and we may update PK, KEK, and DB/DBx while in SetupMode.
> fs1:
> cd uefi
> UpdateVars.efi db db.auth
> UpdateVars.efi KEK kek.auth
> UpdateVars.efi PK pk.auth
Note that I copied my files into the USB-relative “uefi” directory.
Part 4: Enforcing UEFI Secure Boot
You may exit the shell and enter the UEFI setup to explore some now-changed settings. You should see Device Options :: Secure Book Configuration :: Attempt Secure Boot has change to enabled. This change was trigged by a write to PK, KEK, and DB. This changed SetupMode into “user mode”.
Now cross your fingers because a UEFI Secure Boot is about to be attempted. Exit setup and boot from your SD card. The signed shim, stage2 GRUB and kernel are all installed by default and the shim is signed by Microsoft’s CA, which exists in your DB, and that signature list is signed by your KEK.
$ sudo hexdump -C /sys/firmware/efi/efivars/SecureBoot-8be4df61-93ca-11d2-aa0d-00e098032b8c
00000000  06 00 00 00 01                                    |.....|
00000005
And for good measure, plus some more homework, try chipsec again:
[*] Checking protections of UEFI variable 8be4df61-93ca-11d2-aa0d-00e098032b8c:SecureBoot [*] Checking protections of UEFI variable 8be4df61-93ca-11d2-aa0d-00e098032b8c:SetupMode [*] Checking protections of UEFI variable 8be4df61-93ca-11d2-aa0d-00e098032b8c:PK [+] Variable 8be4df61-93ca-11d2-aa0d-00e098032b8c:PK is authenticated (TIME_BASED_AUTHENTICATED_WRITE_ACCESS) [*] Checking protections of UEFI variable 8be4df61-93ca-11d2-aa0d-00e098032b8c:KEK [+] Variable 8be4df61-93ca-11d2-aa0d-00e098032b8c:KEK is authenticated (TIME_BASED_AUTHENTICATED_WRITE_ACCESS) [*] Checking protections of UEFI variable d719b2cb-3d3a-4596-a3bc-dad00e67656f:db [+] Variable d719b2cb-3d3a-4596-a3bc-dad00e67656f:db is authenticated (TIME_BASED_AUTHENTICATED_WRITE_ACCESS) [!] Secure Boot variable dbx is not found
That’s exactly what we expected! The homework being: add a DBx!
I hope this was helpful and fun. There’s bound to be errors, if you would like some clarification, want to help me fix mistakes, or provide criticism please please email me! More Minnowboard and UEFI hardening will continue soon!